Expanding Your Outdoor Living Space: A Step-by-Step Guide on How to Attach a Pergola to a Roof
A pergola is one of the most efficient ways to turn an ordinary outdoor area into a stylish and practical living space. It creates the ideal environment for unwinding, hosting friends, or taking in Kerala’s lovely atmosphere by fusing architectural grandeur with outdoor comfort. When yard space is limited or you want a smooth transition between your interior and outdoor spaces, installing a pergola directly to your home is an excellent alternative.
However, establishing a roof-mounted pergola entails more than just appearance. Proper planning, structural support, and weatherproofing are critical for preventing leaks, preserving roof integrity, and ensuring long-term durability. Understanding how to properly attach a pergola to roof structures will help you accomplish a safe installation while also increasing the value and charm of your property.
In this step-by-step guide, we’ll walk you through everything you need to know about securely attaching a pergola to your roof, from evaluating structural requirements to choosing the right mounting hardware. Whether you’re designing a modern outdoor hideaway or renovating an existing pergola in Kerala, this guide will help you construct a beautiful, long-lasting extension of your living area with superior Scapes Home Essentials products.
Assessment First: How to Attach Pergola to Roof Structures Safely
It’s crucial to determine whether your current roof structure can securely sustain the extra weight of a pergola before making material purchases or starting installation. Ignoring this procedure might result in future structural problems, water damage, and expensive repairs.
Examine local building codes and permit needs first. Regulations frequently establish load-bearing standards, attachment techniques, and safety guidelines for roof-mounted structures. Knowing these specifications can assist you make sure your project is long-lasting and compliant.
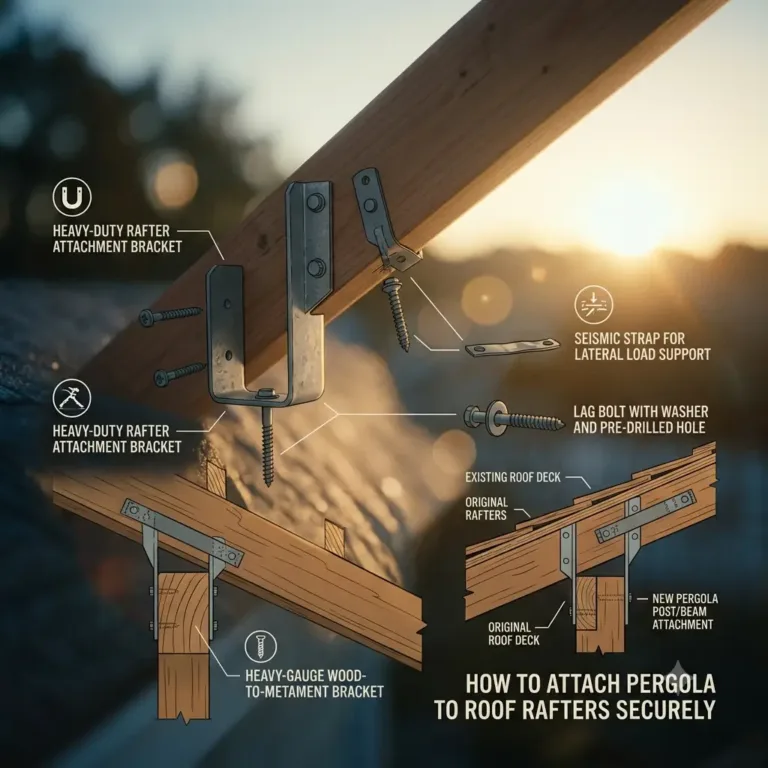
Next, determine which structural components will hold up the pergola. One of the most essential guidelines when learning how to attach a pergola to roof assemblies is that all significant connections must be anchored directly to the roof rafters or other structural framing components. Attaching metal merely to plywood sheathing, fascia boards, or cosmetic trim will not offer the necessary strength to maintain the pergola during normal use, wind loads, or heavy rain.
Weight distribution is another crucial factor. A well-designed pergola distributes its load equally across several connection points, decreasing stress on any individual piece of the roof structure. Assessing load capacity before installation guarantees that the pergola stays safe, preserves the structural integrity of your house, and offers dependable outdoor enjoyment for many years.
Performing a complete structural inspection is the cornerstone of a successful pergola installation and the first step toward establishing a safe, beautiful outdoor living environment.
Choosing the Right Brackets: The Key on How to Attach Pergola to Roof Rafters
When it comes to attaching pergolas to roof structures, utilising the proper hardware is essential. Screwing wooden beams through shingles or roofing materials is not a safe or dependable installation technique. Without enough support and weatherproofing, the structure may become unstable, increasing the danger of leaks and roof damage.
Specialised roof-mounting brackets, such as heavy-duty rafter anchors and elevated pergola mounting systems, are specifically designed to hold the pergola to the home’s structural framing. These brackets provide the strength required to endure wind, rain, and daily use by transferring the weight of the pergola directly to the rafters.
One of the primary benefits of these mounting solutions is that they elevate the pergola beam slightly above the roof surface. By providing necessary space for water drainage, this elevation keeps moisture from getting trapped around the connection points. Additionally, it increases airflow beneath the beam, which lowers the chance of water-related damage and prolongs the life of the roof and pergola.
Purchasing high-quality structural hardware increases both safety and installation efficiency. Many of the difficulties related to roof-mounted pergola projects are eliminated by premium brackets, which are designed for accurate alignment, dependable load distribution, and long-term performance. For homeowners who want to learn how to properly attach a pergola to roof lines, choosing the right brackets is one of the most critical steps in the construction process.
Waterproofing and Flashing: How to Attach Pergola to Roof Systems Without Leaks
One of the most crucial factors when learning how to attach a pergola to a roof structure is safeguarding your home from water intrusion. If attachment points are not adequately sealed and waterproofed, even the strongest mounting hardware may cause expensive damage. Leak prevention should be given top emphasis throughout the installation process since each roof hole represents a possible entrance site for moisture.
The waterproofing process starts with gently lifting or removing the shingles around each mounting place. Once the roof surface has been exposed, a high-quality waterproof underlayment should be applied to provide an extra barrier against moisture. The mounting bracket is then attached directly to the structural rafters, and high-quality exterior-grade silicone sealant is applied around all fastener penetrations and contact points to help block water infiltration.
After the bracket has been placed and sealed, metal flashing should be added around the base of the mounting hardware. In order to divert rainfall away from the penetration point and back into the roof’s drainage system, flashing is essential. Large amounts of water can swiftly take advantage of even the smallest openings. This protective layer is particularly crucial in areas that frequently receive heavy rains, tropical downpours, or intense monsoon conditions.
Once the flashing is properly constructed, the shingles are reinstalled over the higher sections of the flashing to form a layered, weatherproof system. By ensuring that water naturally flows over the flashing rather than underneath it, this overlapping design greatly lowers the chance of leaks.
While each stage of installation is vital, mastering waterproofing and flashing is perhaps the most significant aspect of learning how to attach pergolas to roof structures. A correctly flashed and sealed attachment point safeguards the structural integrity of your roof, eliminates moisture damage, and guarantees your pergola remains a safe and long-lasting addition to your outdoor living space.
Weatherproofing the Wood: Special Considerations for a Pergola in Kerala
When building a pergola in Kerala, selecting the right materials is necessary to withstand high humidity, heavy monsoon rains, and coastal conditions. Sturdy choices like mahogany, treated teak, or premium composite materials provide outstanding resistance to deterioration, moisture, and warping, extending the life of your outdoor building.
Roof attachment locations demand extra attention since excessive moisture can penetrate into improperly sealed connections and cause wood rot over time. Proper waterproofing, sealing, and frequent maintenance are essential for protecting these sensitive regions.
Premium timber should be paired with corrosion-resistant brackets, stainless steel fasteners, and weatherproof mounting systems from Scapes Home Essentials. Quality materials and dependable hardware ensure that your pergola in Kerala is robust, attractive, and ready to resist years of harsh weather conditions.
Securing the Support Beam: Final Steps on How to Attach Pergola to Roof Structures
With the roof brackets properly installed and waterproofed, the next step is attaching the main support beam that forms the foundation of the pergola structure. Accurate measurements are required at this stage to guarantee that the beam fits perfectly with the specified arrangement and roof attachment locations.
Carefully measure, level, and lift the ledger or support beam onto the installed roof brackets. Once properly positioned, fasten it with strong structural lag screws made to support the weight of the pergola and endure prolonged outdoor exposure.
Before proceeding to the rafters and slats, double-check the alignments, spacing, and fastener connections. Ensuring that the beam is level and well fastened will offer a stable foundation for the remainder of the building.
Completing these steps successfully signals the end of learning how to install a pergola on a roof system. Whether you’re designing a modern outdoor hideaway or improving a pergola in Kerala, a correctly installed support beam guarantees a robust, durable, and visually pleasing structure for years to come.
Conclusion
Learning how to attach a pergola to a roof structure necessitates thorough planning, sufficient structural support, dependable waterproofing, and high-quality materials. From determining roof load capacity and selecting the appropriate mounting brackets to weatherproofing connecting points and anchoring the support beam, each step is critical to producing a safe, durable, and visually pleasing outdoor living space.
For homeowners wishing to build a pergola that will withstand Kerala’s harsh climate, investing in high-quality materials and weather-resistant hardware is critical. A professionally installed roof-mounted pergola improves your home’s functionality while also adding long-term value and architectural elegance.
Are you prepared to revamp your outdoor area? Explore Scapes Home Essentials‘ superior pergola solutions and weather-resistant hardware, or contact our specialists now for personalised advice on designing the ideal pergola for your home.